 Taskwarrior stores all the tasks data in the following directory => '~/.task'. Hence, the plan is to regularly backup the contents of this '~/.task' directory to Bitbucket's Hg repository. Note! Regular backup implies only when the data is changed in the '~/.task' directory.
Step 1. Setup SSH authentication with your Bitbucket account Follow all the 7 steps listed in the below blog-post in-order to setup SSH authentication with your remote repository: Hg repository: How to setup authentication using SSH keys on Xubuntu 12.04 for multiple accounts on Bitbucket? Step 2. Create a local Hg repository Now, create a local Hg repository in the directory where the Taskwarrior stores data. Hence, the target directory is '~/.task'. So, run the below commands to setup a local Hg repository: $ cd ~/.task $ hg init $ hg add . $ hg commit -m "Initial commit" Step 3. Setup auto commit & push configuration Now, setup a Python script and respective Hg configurations in-order to auto commit & push to your desired Bitbucket repository: a) Follow all the 5 steps listed in the below blog-post, in-order setup auto commit & push: Hg repository: How to automate commit & push on modification to staged files? b) Now, verify that the 4th line in your Python script reflects the correct path of your local Hg repository i.e. as show below: repo = hg.repository(ui.ui(), '~/.task') Step 4. Setup a crontab job to regular run the above mentioned Python script Now, follow the 2 steps listed in the below blog-post: How to setup a job schedular (i.e. crontab job) to run Python script on Xubuntu 12.04?
0 Comments
 Step 1. Install a GUI front-end to configure crontab jobs on Xubuntu Install 'Scheduled tasks' on your Xubuntu, with the below command: $ sudo apt-get install gnome-schedule Step 2. Schedule a task to run a Python script i. Make sure your Python script has executable right, if not run the below command: $ chmod a+x ~/foo.py ii. Now, fire-up the 'Scheduled tasks' GUI, by running the below command: $ gnome-schedule & iii. Lets say, you wanted to schedule the above Python script to be executed once every 3hour-and-15th minute, then your configuration should reflect the below: 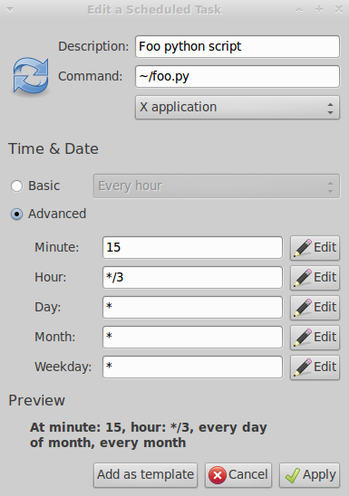  External source of information:
- Configure multiple SSH identities for GitBash, Mac OSX, & Linux - Set up SSH for Git and Mercurial on Mac OSX/Linux Prerequisites: - Mercurial (Hg) - SSH-agent Let's say you have multiple accounts on Bitbucket and wondered how to automate authentication for your Mercurial (Hg) repositories on these accounts. Well, if you find yourself in such a situation then you will find below instructions useful. Lets consider you have 3 accounts on Bitbucket with below usernames: 1. accountusername1 2. accountusername2 3. accountusername3 Now, lets step-up the SSH authentication for the above accounts using your username as an identifier. Step 1. Create SSH keys Create three seperate SSH keys in '~/.ssh/' directory, with the below commands (Note! when asked to enter 'Enter passphrase' leave it blank!): $ cd ~/.ssh/ $ ssh-keygen -f ~/.ssh/SSH_ID_bitbucket_accountusername1 -C "SSH_ID_bitbucket_accountusername1" $ ssh-keygen -f ~/.ssh/SSH_ID_bitbucket_accountusername2 -C "SSH_ID_bitbucket_accountusername2" $ ssh-keygen -f ~/.ssh/SSH_ID_bitbucket_accountusername3 -C "SSH_ID_bitbucket_accountusername3" $ ls ~/.ssh/ Step 2. Create aliases for the above SSH keys Create 'config' file in '~/.ssh/' directory, with the following content: Host accountusername1 HostName bitbucket.org IdentityFile ~/.ssh/SSH_ID_bitbucket_accountusername1 Host accountusername2 HostName bitbucket.org IdentityFile ~/.ssh/SSH_ID_bitbucket_accountusername2 Host accountusername3 HostName bitbucket.org IdentityFile ~/.ssh/SSH_ID_bitbucket_accountusername3 Step 3. Configure Hg data compression on using SSH On your Xubuntu, configure Mercurial (Hg) to compress data. So now edit this file '~/.hgrc' with the below content: [ui] # Name to appear in commits username = MyName <[email protected]> ssh = ssh -C Step 4. Load SSH keys to your Bitbucket account/s Load the above generated SSH keys to your appropriate Bitbucket account respectively. Therefore, just copy-&-paste the content of the below file to your 'accountusername1' Bitbucket's SSH-key editor: '~/.ssh/SSH_ID_bitbucket_accountusername1.pub' Now, repeat this step to your other Bitbucket accounts respectively. Step 5. Load SSH keys to ssh-agent On your Xubuntu, make sure ssh-agent in running under a given PID, with below command: $ ps -e | grep [s]sh-agent List the loaded SSH keys into ssh-agent, with below command: $ ssh-add -l Now, load all above created SSH keys to the ssh-agent, with below commands: $ ssh-add ~/.ssh/SSH_ID_bitbucket_accountusername1 $ ssh-add ~/.ssh/SSH_ID_bitbucket_accountusername2 $ ssh-add ~/.ssh/SSH_ID_bitbucket_accountusername3 $ ssh-add -l Step 6. Test: SSH key authentication Now, test if the SSH key authentication works for the Hg repository created on Bitbucket: i. Create a local Hg repository on your Xubuntu machine, with below commands: $ mkdir ~/AuthTest_Hg $ cd ~/AuthTest_Hg/ $ touch File1.txt $ hg init $ hg add . $ hg commit -m "Initial commit" ii. Create a remote Hg repository called 'AuthTest_Hg' on your Bitbucket account, for e.g. on 'accountusername1' account. iii. Push the local Hg repository created in the above sub-step (i) to the remote repository on Bitbucket, with the below commands: $ cd ~/AuthTest_Hg/ $ hg push ssh://hg@accountusername1/accountusername1/authtest_hg Note! @accountusername1 <= Refers to alias I hope, you are now able to push the local commit to your Bitbucket repository. If so, you have succeeded in setting-up authentication using SSH key. Of course, for testing purposes you may repeat above three sub-steps for rest of your Bitbucket accounts. Step 7. Configure remote repository path If the above test worked, then add the remote repository path to your local repository configuration file and test the simple push command. i. Navigate to the Hg repository i.e. to 'AuthTest_Hg' repository and 'cd' into '/.hg' directory and create a file 'hgrc' with the below content: [paths] default = ssh://hg@accountusername1/accountusername1/authtest_hg ii. Now, test if the simple push works, with the below commands: $ cd ~/AuthTest_Hg/ Now, modify the contents of the 'File1.txt' file, which is in your repository and run the below commands: $ hg commit -m "New modification" $ hg push  External source of information:
- http://taskwarrior.org/ - https://github.com/theunraveler/taskwarrior-web Step 1. Install Taskwarrior $ sudo apt-get install task Step 2. Install Taskwarrior-Web $ sudo gem install taskwarrior-web Step 3. Test: Fire-up the taskwarrior-web's webserver: $ task-web -p 9901 Step 4. Automate launching operation of Taskwarrior-Web: 1. Create a python script called 'Taskwarrior_WebVersion_Launcher.py' in the folder => '~/MySystemCustomisation/' with following content: #!/usr/bin/env python import os import webbrowser os.system('task-web -p 9901') webbrowser.open('http://localhost:9901') 2. Launcher to fire-up Taskwarrior-Web: a) Now, provide executable right to the above created python script i.e. run the below command: $ chmod x Taskwarrior_WebVersion_Launcher.py b) Create, a xfce4-panel launcher with the following command: ~/MySystemCustomisation/Taskwarrior_WebVersion_Launcher.py  Prerequisites:
- None - External source of information: - Video: How to install and configure CouchDB 1.3.0 onto ubuntu desktop Step 1. Install all necessary Build-tools/Dependencies before building-from-source by running the below commands in the terminal: $ sudo apt-get update $ sudo apt-get build-dep erlang $ sudo apt-get build-dep couchdb $ sudo apt-get install libicu-dev libcurl4-gnutls-dev $ sudo apt-get install automake autoconf libtool help2man $ sudo apt-get install libmozjs-dev $ sudo apt-get install libcurl4-openssl-dev $ sudo apt-get install openssl libssl-dev Step 2. Now, install the latest Erlang from Ubuntu Software Center: $ sudo apt-get install erlang Step 3. Now, build & install the CouchDB from source-code, as follows: A. Download CouchDB source-code, for e.g. from the below site: - http://www.nic.funet.fi/pub/mirrors/apache.org/couchdb/source/1.3.1/apache-couchdb-1.3.1.tar.gz B. Unzip the above downloaded source code, for example to: ~/Programs/CouchDB/ C. Build & install from source-code by running the below commands: $ cd ~/Programs/CouchDB/apache-couchdb-1.3.1 $ ./configure $ make && sudo make install $ make clean $ make distclean Step 4. Setup the new installation of CouchDB: A. Setting up CouchDB user 1. Add a new CouchDB user: $ sudo adduser --home /usr/local/var/lib/couchdb --shell /bin/bash couchdb Full Name []: couch_user Room Number []: Work Phone []: Other []: couch_admin 2. Give above user rights to run CouchDB: $ sudo chown -R couchdb: /usr/local/var/lib/couchdb /usr/local/var/log/couchdb /usr/local/var/run/couchdb /usr/local/etc/couchdb $ sudo ln -s /usr/local/etc/init.d/couchdb /etc/init.d/couchdb B. Test: Start & Stop CouchDB: $ sudo service couchdb start Now, in the browser, open http://localhost:5984/ $ sudo service couchdb stop C. Configure CouchDB's port & ip address bindings: $ sudo gedit /usr/local/etc/couchdb/local.ini Now, modify the below lines: From: [httpd] ;port = 5984 ;bind_address = 127.0.0.1 To: [httpd] ;port = 5984 ;bind_address = 0.0.0.0 $ sudo gedit /usr/local/etc/couchdb/default.ini Now, modify the below lines: From: [httpd] port = 5984 bind_address = 127.0.0.1 To: [httpd] port = 5984 bind_address = 0.0.0.0 D. Admin account & installation verification using CouchDB's front-end: 1. Run in terminal: $ sudo service couchdb start 2. Create an admin user: i. Now, in the browser, open http://localhost:5984/_utils/ ii. Click on Login (link is on the right-bottom corner) and type the below details to the field & press create: Username: admin Password: 'Your_choice' 3. Verify this new installation: i. In-order to verify the new installation, clicking the following link on the CouchDB's front-end => 'Verify Installation' (present on the right-hand side). And now you need to again click on the link => 'Verify Your Installation' (present on the left-hand side). Therefore, you will be prompted this message => 'Your installation looks fine. Time to Relax.', this mean that your CouchDB installation was successful. ii. Now, delete the below databases created during this installation-verification, by clicking on 'Overview' link (right-top corner): a) test_suite_db b) test_suite_db2 Step 5. Launching CouchDB on your development machine: Add a launcher to your xfce4-panel in-order to Start CouchDB, with the below command: - gksudo service couchdb start Note! Optionally you can select 'Run in terminal' in-order to view the startup logs.  Prerequisites:
a. Sencha Touch 2 (SDK 2.2.1 + Cmd v3.1.2.342) b. Android SDK Tools (android-17 with adt-bundle-linux-20130522) There are two alternative approaches to build HTML5 apps using build.phonegap.com for OS like Android/IOS/Windows phone/BlackBerry: (a) Approach 1 (Advantage: App seems to run faster on Android emulator): Sencha App -> Native build using st-cmd and Android SDK -> Phonegap specfic config.xml -> GitHub/Zip-package -> build.phonegap.com (b) Approach 2: Sencha App -> Production build using st-cmd -> Phonegap specfic config.xml -> GitHub/Zip-package -> build.phonegap.com Detailed description of the approaches: Approach 1 1. After generating an app source codes using st-cmd, download additional icons to the directory 'resources/icons/' from the below repository: - https://github.com/phonegap/phonegap-start/tree/master/www/res/icon 2. Now, download additional screen-icons to the directory 'resources/screen/' directory from the below repository: - https://github.com/phonegap/phonegap-start/tree/master/www/res/screen 3. Now, in the apps root directory you can locate 'app.json' file, modify this file with the below content: "resources": [ "resources/images", "resources/icons", "resources/startup", "resources/screen" ] 4. Now, generate a native-build using st-cmd & Android SDK. The result should be an apk file in the '/build/app_name/native/' directory. 5. Now, unzip the above apk file. Note! Only the 'assets' directory is of importance. 6. Add a config.xml (avaiable https://github.com/phonegap/phonegap-start/tree/master/www) to the above 'assets' directory. Now, modify the content of the config.xml as shown below: <name>UniversalMobileApp</name> <description> Test101: HTML5 App developed with Sencha Touch 2 framework for multiple mobile OS. </description> <author href="http://website.com" email="[email protected]"> Developer Name </author> <!-- Customize your app and platform with the preference element. --> <preference name="phonegap-version" value="2.9.0" /> <!-- all: current version of PhoneGap --> <preference name="orientation" value="default" /> <!-- all: default means both landscape and portrait are enabled --> <preference name="target-device" value="universal" /> <!-- all: possible values handset, tablet, or universal --> <preference name="fullscreen" value="true" /> <!-- all: hides the status bar at the top of the screen --> <preference name="webviewbounce" value="true" /> <!-- ios: control whether the screen 'bounces' when scrolled beyond the top --> <preference name="prerendered-icon" value="true" /> <!-- ios: if icon is prerendered, iOS will not apply it's gloss to the app's icon on the user's home screen --> <preference name="stay-in-webview" value="false" /> <!-- ios: external links should open in the default browser, 'true' would use the webview the app lives in --> <preference name="ios-statusbarstyle" value="black-opaque" /> <!-- ios: black-translucent will appear black because the PhoneGap webview doesn't go beneath the status bar --> <preference name="detect-data-types" value="true" /> <!-- ios: controls whether data types (such as phone no. and dates) are automatically turned into links by the system --> <preference name="exit-on-suspend" value="false" /> <!-- ios: if set to true, app will terminate when home button is pressed --> <preference name="show-splash-screen-spinner" value="true" /> <!-- ios: if set to false, the spinner won't appear on the splash screen during app loading --> <preference name="auto-hide-splash-screen" value="true" /> <!-- ios: if set to false, the splash screen must be hidden using a JavaScript API --> <preference name="disable-cursor" value="false" /> <!-- blackberry: prevents a mouse-icon/cursor from being displayed on the app --> <preference name="android-minSdkVersion" value="17" /> <!-- android: MIN SDK version supported on the target device. MAX version is blank by default. --> <preference name="android-installLocation" value="auto" /> <!-- android: app install location. 'auto' will choose. 'internalOnly' is device memory. 'preferExternal' is SDCard. --> <!-- Define app icon for each platform. --> <icon src="resources/icons/android/icon-36-ldpi.png" gap:platform="android" gap:density="ldpi" /> <icon src="resources/icons/android/icon-48-mdpi.png" gap:platform="android" gap:density="mdpi" /> <icon src="resources/icons/android/icon-72-hdpi.png" gap:platform="android" gap:density="hdpi" /> <icon src="resources/icons/android/icon-96-xhdpi.png" gap:platform="android" gap:density="xhdpi" /> <icon src="resources/icons/blackberry/icon-80.png" gap:platform="blackberry" /> <icon src="resources/icons/blackberry/icon-80.png" gap:platform="blackberry" gap:state="hover"/> <icon src="resources/icons/ios/icon-57.png" gap:platform="ios" width="57" height="57" /> <icon src="resources/icons/ios/icon-72.png" gap:platform="ios" width="72" height="72" /> <icon src="resources/icons/ios/icon-57-2x.png" gap:platform="ios" width="114" height="114" /> <icon src="resources/icons/ios/icon-72-2x.png" gap:platform="ios" width="144" height="144" /> <icon src="resources/icons/webos/icon-64.png" gap:platform="webos" /> <icon src="resources/icons/windows-phone/icon-48.png" gap:platform="winphone" /> <icon src="resources/icons/windows-phone/icon-173.png" gap:platform="winphone" gap:role="background" /> <!-- Define app splash screen for each platform. --> <gap:splash src="resources/screen/android/screen-ldpi-portrait.png" gap:platform="android" gap:density="ldpi" /> <gap:splash src="resources/screen/android/screen-mdpi-portrait.png" gap:platform="android" gap:density="mdpi" /> <gap:splash src="resources/screen/android/screen-hdpi-portrait.png" gap:platform="android" gap:density="hdpi" /> <gap:splash src="resources/screen/android/screen-xhdpi-portrait.png" gap:platform="android" gap:density="xhdpi" /> <gap:splash src="resources/screen/blackberry/screen-225.png" gap:platform="blackberry" /> <gap:splash src="resources/screen/ios/screen-iphone-portrait.png" gap:platform="ios" width="320" height="480" /> <gap:splash src="resources/screen/ios/screen-iphone-portrait-2x.png" gap:platform="ios" width="640" height="960" /> <gap:splash src="resources/screen/ios/screen-ipad-portrait.png" gap:platform="ios" width="768" height="1024" /> <gap:splash src="resources/screen/ios/screen-ipad-landscape.png" gap:platform="ios" width="1024" height="768" /> <gap:splash src="resources/screen/windows-phone/screen-portrait.jpg" gap:platform="winphone" /> <access origin="*"/> <!-- allow local pages --> 8. Now, in the 'assets' directory, rename the file 'index.html' to 'main.html' 9. Now, create a new 'index.html' file with below content: <!doctype html> <html> <head> <title>tittle</title> <script> window.location='./main.html'; </script> <body> </body> </html> 10. Now, in the 'assets' directory, initialise a Git-repositry and push this repository to a new GitHub. 10.1 This is an optional step => Zipped package the entire 'assets' directory & loaded to 'build.phonegap.com' & generate the distribution packages for all possible OS. 11. Now, visit this site 'build.phonegap.com' & refer to the newly updated GitHub repository & generate the distribution packages for all possible OS. Note! Don't forget to refer to appropriate certificates for OS before package generation on 'build.phonegap.com'. Approach 2 1. Follow the steps 1 to 3 in the above mentioned 'Approach 1' 2. Now, generate a production-build using st-cmd & Android SDK. The result is that the all HTML5 related files are dumped into '/build/app_name/production/' directory. 3. Follow the steps 6 to 11 in the above mentioned 'Approach 1'. However note in these steps you should treat 'assets' directory as 'production' directory!  Prerequisites:
a. Sencha Touch 2 (SDK 2.2.1 + Cmd v3.1.2.342) b. Android SDK Tools (android-17 with adt-bundle-linux-20130522) 1. Android icons Create following png files in your Sencha app directory: - resources/icons/Icon_Android36.png - resources/icons/Icon_Android48.png - resources/icons/Icon_Android72.png - resources/icons/Icon_Android96.png 2. Certificate generation In the terminal, 'cd' into the Android sdk directory, for example: $ cd ~/Programs/MobileOS/Android_OS/adt-bundle-linux-x86-20130522 Now, run the below command to generate a certificate: $ keytool -genkey -v -keystore android422.keystore -alias android422 -keyalg RSA -keysize 2048 -validity 10000 3. 'packager.json' configuration The app's name is 'chukar' and in its root directory, you can locate 'packager.json' file. This file is to be modified with following configuration: - "applicationId":"com.demo.chukar" - "icon": { "36":"resources/icons/Icon_Android36.png", "48":"resources/icons/Icon_Android48.png", "72":"resources/icons/Icon_Android72.png", "96":"resources/icons/Icon_Android96.png" } - "platform":"AndroidEmulator" - "certificatePath":"~/Programs/MobileOS/Android_OS/adt-bundle-linux-x86-20130522/android422.keystore" - "certificateAlias":"android422" - "certificatePassword":"android422" - "sdkPath":"~/Programs/MobileOS/Android_OS/adt-bundle-linux-x86-20130522/sdk" - "androidAPILevel":"17" 4. Build to test for production In the terminal, 'cd' into your app directory and run below commands to fire-up the build process and test the app in the browser: $ sencha app build production $ sencha fs web -port 9911 start -map ~/Workspace/Sencha-Workspace/Dev-Apps/chukar/build/chukar/production/ 5. Enable access to st-cmd's 'st-res' folder within app's root directory In the terminal, 'cd' into app's root directory and run the below command to create a symbolic-linked folder: $ sudo ln -s ~/Programs/Sencha/Sencha/Cmd/3.1.2.342/stbuild/st-res 6. Fire-up Android device emulator In a new terminal, 'cd' into ~/Programs/MobileOS/Android_OS/adt-bundle-linux-x86-20130522/sdk/tools and run: $ ./emulator -avd Android422 7. Build native package using st-cmd In the terminal, 'cd' into the app's root directory and run: $ sencha --debug app build native 8. Install newly built app on to Android device emulator In the terminal, 'cd' into Androids sdk's 'platform-tools' directory: $ cd ~/Programs/MobileOS/Android_OS/adt-bundle-linux-x86-20130522/sdk/platform-tools Now, run the below command: $ ./adb install ~/Workspace/Sencha-Workspace/Dev-Apps/chukar/build/chukar/native/chukar.apk 9. In the emulator, open the newly installed app.  Having more desktop real-estate on your laptop is great. Well, here is my experience in configuring an external-monitor to my laptop running Xubuntu.
This setup is a three step process: A. Get to know all names of display outputs on your laptop B. Create a shell script file to house dual-monitor configuration C. Setup Xfce desktop session to recall dual-monitor configuration during login Target hardware --------------- Laptop type: IBM Thinkpad T43 External monitor type: EIZO-FlexScan S2202W (Resolution: 1680x1050; Connection: VGA) Available Software ------------------ Xubuntu 10.04(lucid) xrandr Setup procedure --------------- A. Get to know all names of display outputs on your laptop In order to know the list of outputs for displays available/connected to your laptop's POSIX OS. I run the below command in the terminal: $ xrandr In my case, xrandr lists these outputs [Note! At the time of running xrandr in my terminal... I have already established the dual-monitor setup & it's up-and-running]: ......................................................................... Screen 0: minimum 320 x 200, current 3080 x 1050, maximum 4096 x 4096 VGA-0 connected 1680x1050+1400+0 (normal left inverted right x axis y axis) 474mm x 297mm 1680x1050 60.0*+ 1280x1024 75.0 60.0 1280x960 60.0 1152x864 75.0 1024x768 75.1 70.1 60.0 800x600 72.2 75.0 60.3 56.2 640x480 72.8 75.0 60.0 720x400 70.1 DVI-0 disconnected (normal left inverted right x axis y axis) LVDS connected 1400x1050+0+0 (normal left inverted right x axis y axis) 0mm x 0mm 1400x1050 60.5 + 60.0* 1600x1024 60.2 1280x1024 59.9 60.0 1440x900 59.9 1280x960 60.0 59.9 1280x854 59.9 1360x768 59.8 1280x800 59.8 1152x864 60.0 1280x720 59.9 1152x768 59.8 1024x768 60.0 59.9 800x600 60.3 59.9 848x480 59.7 720x480 59.7 640x480 59.9 59.4 S-video disconnected (normal left inverted right x axis y axis) ......................................................................... Now that, xrandr has helped me to get a list of names related to display outputs. Knowing these names as references to the display outputs, I can now setup the external monitor connected to my laptop as an expansion to Xubuntu-desktop's real-estate (i.e. a dual-monitor setup): VGA-0 <- This display output name refers to my laptop's own display LVDS <- This display output name refers to the external display connected to my laptop via VGA cable B. Create a shell script file to house dual-monitor configuration Create the below shell script file called '.dualmonitorsettings.sh' and give it executable-rights. Note the below points! - I saved this shell script file under user's root directory i.e. /home/USER/ - Last section in this shell script i.e. "# Restart QuickSynergy-Client". Is applicable, only if you have QuickSynergy running in client mode on your laptop. If you don't understand what this is or you have not installed QuickSynergy as a client on your local machine then comment the two lines belonging to this section. ......................................................................... #!/bin/bash # Created on Nov 17, 2012 # Author: Nirdharsh Shetty # # Help: Shell command to list the names of display outputs => xrandr # External-Resources: http://askubuntu.com/questions/91221/how-to-tell-xubuntu-not-to-clone-but-to-expand-the-laptop-display-to-the-externa # # RESOLUTION SETTINGS # This sets your laptop monitor, LVDS to its best resolution. xrandr --output LVDS --mode 1400x1050 --rate 60 # This sets your VGA-0 monitor to its best resolution. xrandr --output VGA-0 --mode 1680x1050 --rate 60 # MONITOR ORDER # Put the Laptop right, VGA-0 monitor left # xrandr --output VGA-0 --left-of LVDS # Put the Laptop left, VGA-0 monitor right xrandr --output LVDS --left-of VGA-0 # PRIMARY MONITOR # This sets your laptop monitor, LVDS as your primary monitor. xrandr --output LVDS --primary # This sets your VGA-0 monitor as your primary monitor. # xrandr --output VGA-0 --primary # Restart QuickSynergy-Client kill `ps h -o pid -C synergyc` synergyc 192.168.1.33 & ......................................................................... Now, a quick test of the newly created shell script -> '.dualmonitorsettings.sh' as a dual-monitor configurator. I run this script in the terminal and got the results I wanted, i.e.: - An external monitor connected to my laptop, now acts as an expansion to Xubuntu-desktop's real-estate - Latop is placed to the left-side-of external monitor - QuickSynergy-Client has been restarted and it automatically re-scales to the newly configured desktop real-estate C. Setup Xfce desktop session to recall dual-monitor configuration during login So to make the Xubuntu remember the dual-monitor setup, I reference the '.dualmonitorsettings.sh' shell script within Xfce desktop session's startup setting. This startup setting will be invoked during login to Xfce desktop. Here is the step-wise explanation: i. Under Xubuntu navigate to the following: Applications > Settings > Exfce 4 Settings Manager > Session and Startup ii. In the 'Session and Startup' window select the tab 'Application Autostart'. Now, click the button 'Add' and configure these fields in the appearing dialog window: ......................................................................... Name: DualMonitorSetup Description: Setup external monitor as a dual-monitor configuration Command: /home/USER/.dualmonitorsettings.sh ......................................................................... Note! Make sure this newly added Xfce desktop setting is ticked (i.e. tick the check-box) You have now completed the setup procedure for expanding desktop's real-estate on to the external monitor. So, every-time you logon to your Xubuntu machine, your dual-monitor setup will be made available to you. That's all folks... |
AuthorCategories
All
Archives
January 2019
|
 RSS Feed
